
How to Set Sag
This is in turn used to determine the proper air pressure or spring rate to use with your Avy Suspension
Based on our experience and testing we recommend 30% sag for
the rear and 22% sag for the front suspension.
There are some exceptions to this and we will discuss
your options when setting up your suspension and suggest the proper sag percentage.
Proper sag is critical to archive the correct bike geometry
and ride characteristics.
Too much sag will make the suspension ride too low in the stroke and there
will not be enough spring preload force to fully extend your suspension for
the next bump.
This will cause the suspension to pack up and feel dead and harsh.
Increasing the rebound speed will have no effect because the spring force
is just not there to extend it back out.
Too little sag will cause the suspension to top-out and and
not follow the bumps properly.
The small bump performance will be poor and the rebound will always feel too
fast at the top of the stroke.
 |
| Rear Air Shock Set-up
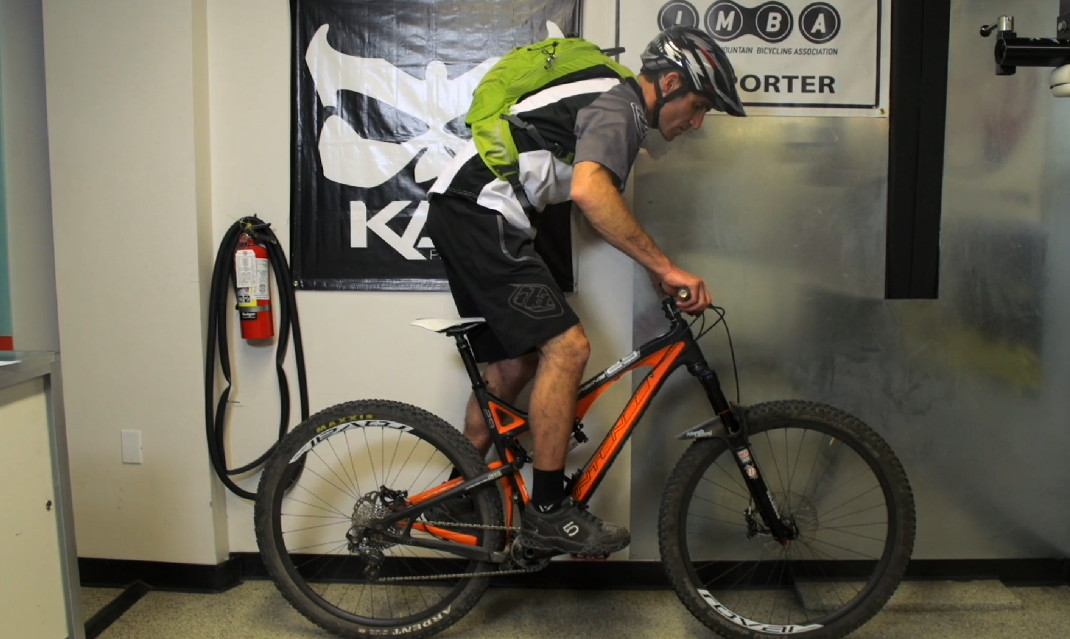
Place the bike next to a wall or have a assistant hold the bike while you climb aboard. Wear what you would on a ride, including filled hydration pack, armor, and such. Stand on your pedals in the attack position, centering your weight over the bike. Gently bounce a few times, then slowly reach down and push the travel indicator(o-ring) up against the shock body, without compressing the shock. A more accurate method is to have your assistant measure the eye to eye of the shock, i.e. from the top of the upper bolt to the top of the lower bolt, assuming they are the same diameter, or as close to center to center as possible. Slowly dismount the bike, moving forward, so you don’t compress the shock. With your air spring pressure set properly, your travel indicator should move 30% of the shock stroke, or exposed shock stanchion. Increase or decrease air pressure five PSI at a time until proper sag is achieved. Write down the air pressure figure that it took to reach the proper sag point for your bike. Example: For a shock size 7.875 inch eye to eye
and a 2.25 inch stroke |
Front Air Fork Set-up
Place the bike next to a wall or have a assistant hold the bike while you climb aboard. Wear what you would on a ride, including filled hydration pack, armor, and such. Stand on your pedals in the attack position, centering your weight over the bike. Gently bounce a few times, then slowly reach down and push the travel indicator(o-ring) down against the dust seal, without compressing the fork. Slowly dismount the bike, moving backward, so you don’t compress the fork. With your air spring pressure set properly, your travel indicator should move 22% of the fork travel. Increase or decrease air pressure five PSI at a time until proper sag is achieved. Write down the air pressure figure that it took to reach the proper sag point for your bike. Example: For a 160 mm travel fork |
Rear Coil Shock Set-up
Place the bike next to a wall or have a assistant hold the bike while you climb aboard. Wear what you would on a ride, including filled hydration pack, armor, and such. Stand on your pedals in the attack position, centering your weight over the bike. Gently bounce a few times, have your assistant measure the eye to eye of the shock, i.e. from the top of the upper bolt to the top of the lower bolt, assuming they are the same diameter, or as close to center to center as possible. With your spring preload set properly, the eye to eye should decrease by 30% of the shock stroke. Increase or decrease the number of turns of preload until proper sag is achieved. Write down the number of turns of preload that it took to reach the proper sag point for your bike. The number of turns is counted with the bike hanging, no weight on the wheels, from the point at which the spring starts to not rattle to the required preload turns to achieve the proper sag. This number must fall within 1.5 turns to 4.5 turns, values less than 1.5 turns requires you purchase a lighter spring, and values greater than 4.5 turns requires a stiffer spring. When looking for the new spring be sure that the spring diameter and stroke match your shock spring collars and shaft stroke. Avalanche, Rockshox and Romic springs are 1.5 inch inside diameter, Cane Creek, Marzocchi springs are 1.43 inches inside diameter and Fox & Elka are 1.35 inches inside diameter. Most 1.43 springs will work on smaller shocks, just check the clearance with the reservoir and spring wire. Example: For a shock size 7.875 inch eye to eye
and a 2.25 inch stroke |
| Front Coil Fork Set-up
Place the bike next to a wall or have a assistant hold the bike while you climb aboard. Wear what you would on a ride, including filled hydration pack, armor, and such. Stand on your pedals in the attack position, centering your weight over the bike. Gently bounce a few times, then slowly reach down and push the travel indicator(o-ring) down against the dust seal, without compressing the fork. Slowly dismount the bike, moving backward, so you don’t compress the fork. With your spring preload adjuster or preload washers set properly, your travel indicator should move 22% of the fork travel. Increase or decrease spring preload until proper sag is achieved. Remove the fork cap and measure how much spring preload is added when the cap is screwed back on. Write down amount of preload that it took to reach the proper sag point for your bike. This number must fall within 5 mm to 10 mm, values less than 5 mm requires you purchase a lighter spring, and values greater than 10 mm requires a stiffer spring. Example: For a 160 mm travel fork
|

techinfo@avalanchedownhillracing.com